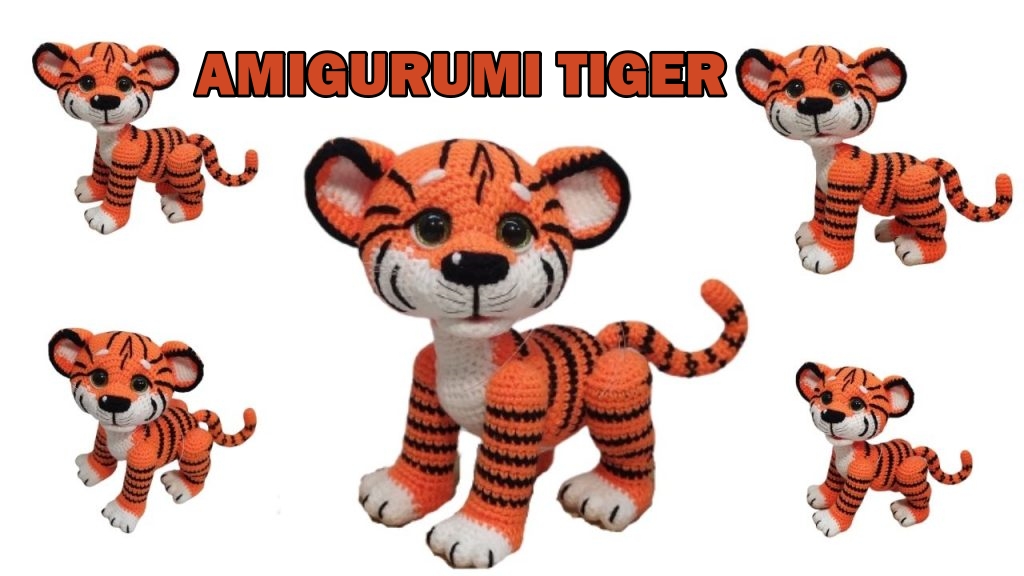
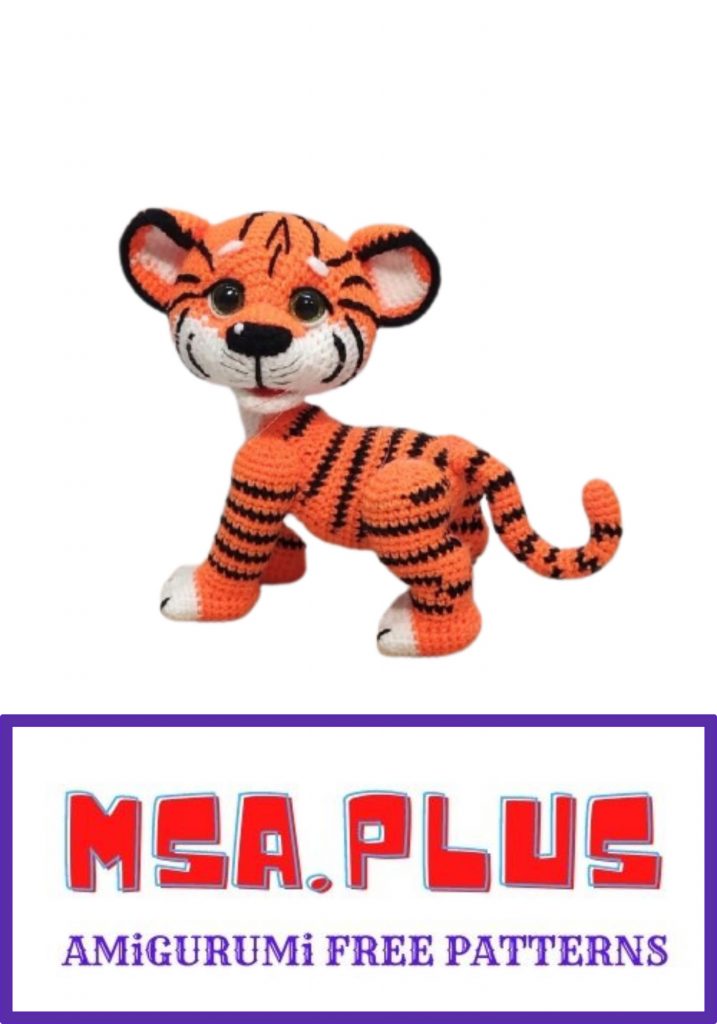
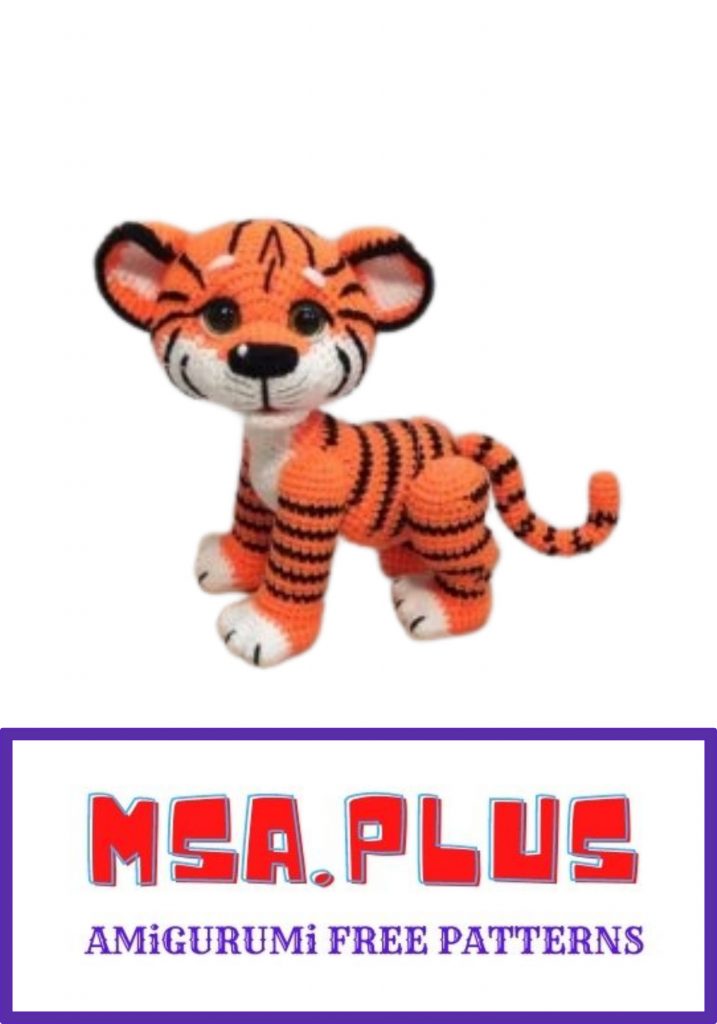
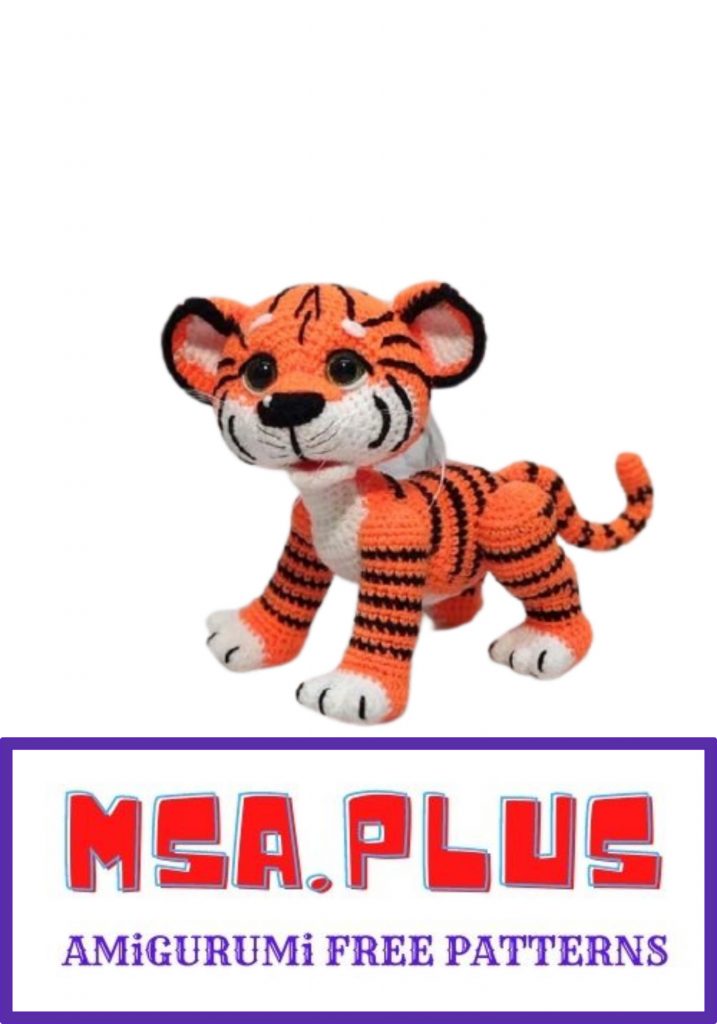
Little Cute Tiger Amigurumi Free Crochet Pattern
The most beautiful amigurumi animal patterns free patterns are available on this site for free. I shared amigurumi tiger pattern with you in this article.
Height 16 cm
NECESSARY MATERIALS
° Hook 2
° Eyes 14 mm
° Line
° New yarn for children (acrylic 50 g 200 m) orange 40 g, black 20 g, white 20 g
° Copper wire for tail with a cross section of 1.5 mm 15 cm
° Synthepukh
° Large eye needle
ABBREVATIONS:
ch – chain
sl-st- slip stitch
sc – single crochet
hdc – half double crochet
inc- increase (knit two in one loop)
dec – decrease (knit two loops with one)
(…) * – repeat what is indicated in parentheses
number of times after *
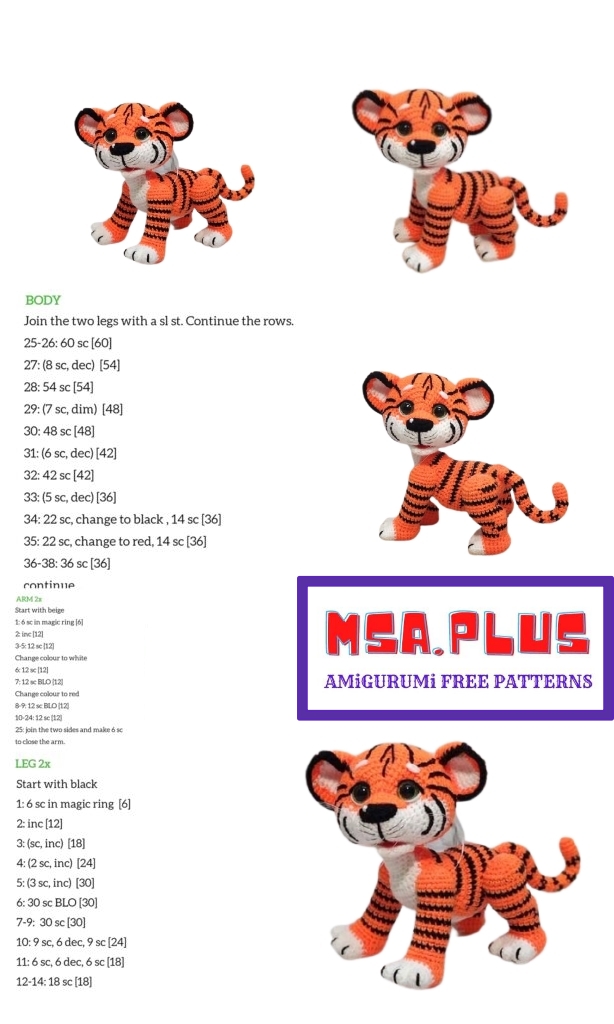
We start with the body.
REDHEAD
1. Into magic ring 6sc
2. (inc) * 6 = 12
3. (1sc, inc) * 6 = 18
4. (2sc, inc) * 6 = 24
5. (3 sc, inc) * 6 = 30
6. 11sc red, change to black 8sc, change to red 11 sc = 30
7. White 2sc, red 26sc, white 2sc = 30
8. White 2sc, red 2sc, inc, 3sc, inc, 12sc, inc, 3sc, inc, 2sc, white 2sc = 34
9. 3sc white, 5sc red, 18sc black, 5sc red, 3sc white, = 34
The marker goes strictly in the center of the abdomen. If it shifts, align
10. 3sc white, red (1sc, inc) * 2, 20sc, (inc, 1sc) * 2, white 3sc = 38
11. White 4sc, red 30sc, white 4sc = 38
12. White 2sc, inc, 1sc, red 3sc, black 24sc, red 3sc, white 1sc, inc, 2sc = 40
13. White 3sc, inc, 1sc, red 30sc, white 1sc, inc, 3sc = 42
14. White 6sc, red 30sc, white 6sc = 42
15.White 4sc, inc, 1sc, red 3sc, black 24sc, red 3sc, white 1sc, inc, 4sc = 44
16. White 7sc, red 10sc, dec, 6sc, dec, 10sc, white 7sc = 42
17. White 7hdc, red 4hdc, 20sl-st, 4hdc, white 7hdc = 42
18. White 7hdc, red 5hdc, 5sc, dec, 4sc, dec, 5sc, 5hdc, white 7hdc = 40
19. White (2sc, dec) * 2, red 3sc, black 18sc, red 3sc, white (dec, 2sc) * 2 = 36
20. White 6hdc, red 4hdc, 16sl-st, 4hdc, white 6 hdc = 36
21-22. White 2hdc, dec, 3hdc, red 4hdc, 4sc, inc, 4sc, inc, 4sc, 4hdc, white, 3hdc, dec, 2hdc = 36
23-24. White 7hdc, red 2hdc, 2sc, 14sl-st, 2sc, 2hdc, white 7hdc = 36
25. White 7sc, red 4sc, black 14sc, red 4sc, white 7sc = 36
26. White 7hdc, red 4hdc, 1sc, 12sl-st, 1sc, 4hdc, white 7hdc = 36
27. White (1hdc, dec) * 2, 2hdc, red 3hdc, 1sc, 12sl-st, 1sc, 3hdc, white 2hdc, (dec, 1hdc) * 2 = 32
28. White (1sc, dec) * 2, 2sc, red 1sc, 14sl-st, 1sc, white 2sc, (dec, 1sc) * 2 = 28
29. White (1sc, dec) * 2, 1sc, red 1sc, dec, 8sl-st, dec, 1sc, white 1sc, (dec, 1sc) * 2 = 22
30. White 2hdc, dec, 1sc, red 12sl-st, white 1sc, dec, 2hdc = 20
31-35. White 5 sc, red 10sl-st, white 5sc = 20
When stuffing with synthetic fluff, it highlights all the bends and bulges, that is, fill these places denser.
HIND PAWS
We start the fingers with white. We knit three pieces, do not break the thread on the third
1. Into magic ring 6 sc
2. (1sc, inc) * 3 = 9
3.9 sc
Connect your fingers
4.4sc for the third finger, 5sc for the second, 9sc for the first, 4sc for the second and 5 sc for the third = 27
5.3sc, dec, 3sc, dec, 7sc, dec, 3sc, dec, 3sc = 23
6.4sc, dec, 17sc = 22
Change the thread to red
7.10.22sc
11. (3sc, dec) * 4, 2sc = 18
12.18 sc
13. (1sc, dec) * 6 = 12
14. (dec) * 6 = 6
PULL THE HINGES
Further along the foot from the center of the heel in a circle, crocheting between the loops, knit 18 sc.
If you are not familiar with this method, you can dial a chain of 18 ch, close it in a ring and knit in a circle. Then sew to the foot.
The marker runs down the center of the back of the leg. Align.
1.18 sc
2. jim 3sc, black 12sc, red 3sc = 18
3. Redhead 18sc
4. Black 4sc, red 10sc, black 4sc = 18
5. Redhead 7sc, inc, 2sc, inc, 7sc = 20
6. Red 5sc, black 3sc, inc, 2sc, inc, 3sc, red 5sc = 22
7. Redhead 9sc, inc, 2sc, inc, 9sc = 24
8. jim dec, 20sc, dec = 22
9. Black dec, 7sc, inc, 2sc, inc, 7sc, dec = 22
10. Red dec, 18sc, dec = 20
11. Redhead 20sc
12. Redhead inc, 18sc, inc = 22
13. Black inc, 20sc, inc = 24
14-15. Red 24sc
16. Black 7sc, red 10sc, black 7sc = 24
17. jim 24sc
18. (2sc, dec) * 6 = 18
19. (1sc, dec) * 6 = 12
20. (dec) * 6 = 6
Pull off the hinges
Fill the upper part of the thigh loosely, so that when sewn, they do not stick out strongly to the sides. Fill the bottom of the paws tightly, highlighting the back knee with padding polyester.
FRONT LEGS
Feet fit in the same way as the back.
1. Cast on 20 sc on the heel from the center of the heel
2-3. Red 20 sc
4. Black 7sc, dec, 2sc, dec, 7sc = 18
5-6. Redhead 18sc
7. Black 18 sc
8-9. Redhead 18 sc
10. Black 18 sc
11-12. Redhead 18 sc
13. Black 18 sc
14-15. Redhead 18 sc
16. Black 18 sc
17. Redhead (3sc, inc) * 4, 2sc = 22
18-19.22sc
20.1sc, (3sc, dec) * 4, 1sc = 18
21. (1sc, dec) * 6 = 12
22. (dec) * 6 = 6
Pull off the hinges
Embroider claws with one stitch on your fingers
TAIL
Black stripes can be made arbitrarily. For example, every 2 rows, as well as on the legs
1. Into magic ring 6 sc
2. (1sc, inc) * 3 = 9
Stuffing along the way is very loose, you can insert the wire and push it deeper into the body.
3-28.9 sc
29. (2sc, dec) * 2, 1sc = 7
30-34.7sc
Leave the thread for sewing.
Sew the tail under the first black stripe
Sew the hind paws to the body, so that the part of the body protrudes above and slightly behind them. Flatten the hips and press them more tightly to the body, secure with needles and sew.
Make sure they are symmetrical.
The front legs are sewn in the same way, but make sure that the feet are level with the hind legs. For convenience, you can pierce one front leg with a knitting needle, then the body and the other leg and put the tiger cub. If it is stable, you can sew on. If not, then you need to correct your legs (raise or lower).
HEAD
We start with white.
1. Into magic ring 6sc
2. (inc) * 6 = 12
3. (1sc, inc) * 6 = 18
4. (2sc, inc) * 6 = 24
5-7. 24 sc
The marker goes down the center of the bottom of the head. In the process of knitting, align the offset loops so that it goes strictly in the center.
8. 4sc, inc, inc, 2sc, (inc) * 8, 2sc, inc, inc, 4sc = 36
9.White 5sc, inc, inc, 3sc, red 1sc, then behind the rear PPs – (for the left front PPs we will knit the nose pad) 1hdc, increase hdc, 2hdc, increase hdc, 1hdc, (increase hdc) * 2, 1hdc, increase in hdc, 2hdc, increase in hdc, 1hdc, then for both points 1sc, white, 3sc, inc, inc, 5sc = 46
10. White 6sc, (inc) * 3, 4sc, red 20 hdc, white 4sc, (inc) * 3, 6sc = 52
11. White 7sc, (inc) * 3, 4 sc, red 2sc, 20hdc, 2sc, white 4sc, (inc) * 3, 7sc = 58
12. White 9 sc, (inc) * 3, 4sc, red 3sc, 20hdc, 3sc, white 4sc, (inc) * 3, 9 sc = 64
13. White 18sc, red 4sc, 20hdc, 4sc, white 18sc = 64
Then we knit only red
14. 20.64 sc (7 rows)
21. 9sc, dec, 1sc, dec, 36sc, dec, 1sc, dec, 9 sc = 60
22-24.60sc (3 rows)
25. (8 sc, dec) * 6 = 54
26. (7 sc, dec) * 6 = 48
27. (6sc, dec) * 6 = 42
28. (5sc, dec) * 6 = 36
29. (4 sc, dec) * 6 = 30
30. (3 sc, dec) * 6 = 24
31. (2sc, dec) * 6 = 18
32. (1sc, dec) * 6 = 12
33. (dec) * 6 = 6
Pull off the hinges
Pad on the nose.
We knit in rotary rows
1. Kit in the center from the left sts 10 sc
2-3. 10 sc.
4. Dec, 6 sc, dec = 8
5. Dec, 4 sc, dec = 6
Sew on after nose tightening.
Nose tightening.
Insert the needle from the bottom of the muzzle between 7 and 8 rows, bring it out above the ka by 3 rows, throw the thread over the top of the muzzle and re-insert the needle from the bottom and up. Tighten.
Sew an overlay on the muzzle on top.
Eye tightening.
Look at the photo.
Insert the needle from the bottom of the head into the first red row, bring it into the eye area (this is the first extra row of – hdc and the edge of the bridge on the nose and grab 3 sc to the bridge of the nose) and return back down. Pull off. The second is similar. Between the eyes 12 hdc
NOSE
Black.
1. A chain of 4 ch, do not close into a ring and knit in a circle around the chain on both sides inc, 1sc, in one loop 4sc, on the other side 1sc, inc = 10
2. inc, inc, 1sc, (inc) * 4, 1sc, inc, inc = 18
Fold piece lengthwise and work through both sides 9 sc
Sew straight side up, oval down.
Embroider with a thin thread (I took ordinary sewing threads) along the white part of the muzzle of the line
The lower part of the muzzle.
White.
1. Into magic ring 6 sc
2. (inc) * 6 = 12
3. (1sc, inc) * 6 = 18
4-6.18sc
Fold over and knit on both sides at once 9 sc. Sew under the muzzle as in the photo. Tinted red inside.
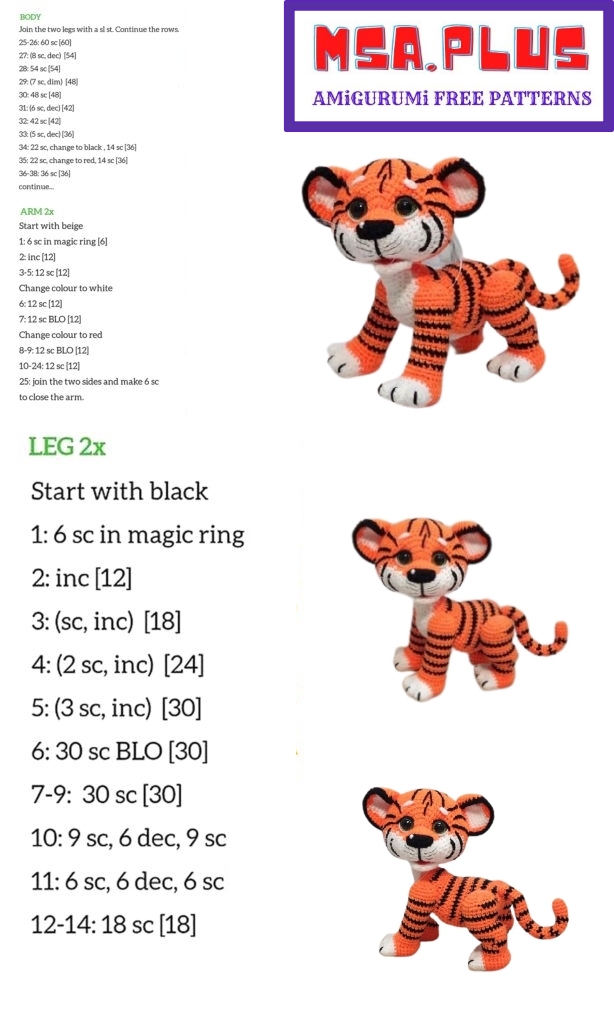
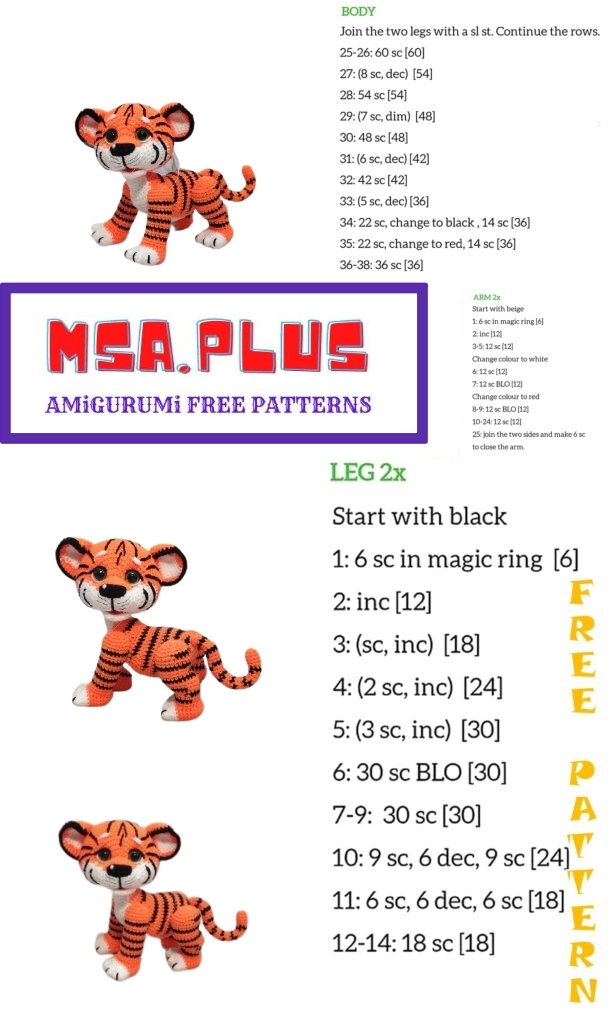
EARS
Let’s start redhead
1.into magic ring 6sc
2. (inc) * 6 = 12
3. (1sc, inc) * 6 = 18
4. White (2sc, inc) * 2, red (2sc, inc) * 4 = 24
5. White (3sc, inc) * 2, red (3sc, inc) * 4 = 30
6-9. White 10sc, red 20sc = 30 (4 rows)
Fold the piece in half white in the center and knit on both sides at once 15 sc.
Tie ear in a circle with black hdc
Bend one corner of the ear slightly inward (by about 3sc) and sew on. Sew on the ears.
The lower part of the ear is at the level of the white part, count 3 rows from it and sew the lower part of the ear on
Move the upper part of the ear back relative to the bottom by 4 rows. There are 15 rows between the ears.
Embroider stripes on the head, as in the photo.
Embroider eyebrows.
Glue my eyes. Embroider white on the bottom of the eyes, on top with a black eyelid.
Embroider a highlight on the nose.
Make antennae from the fishing line, attaching like a fringe to a scarf.